

Hey there, I’m Adam Steele. If you’ve stepped into the gym recently, looked around at the racks of dumbbells and confusing machines, and felt completely overwhelmed, I want you to know something: you are not alone. We have all been there.
The biggest hurdle in fitness isn’t lifting the weight; it’s knowing what to lift and when.
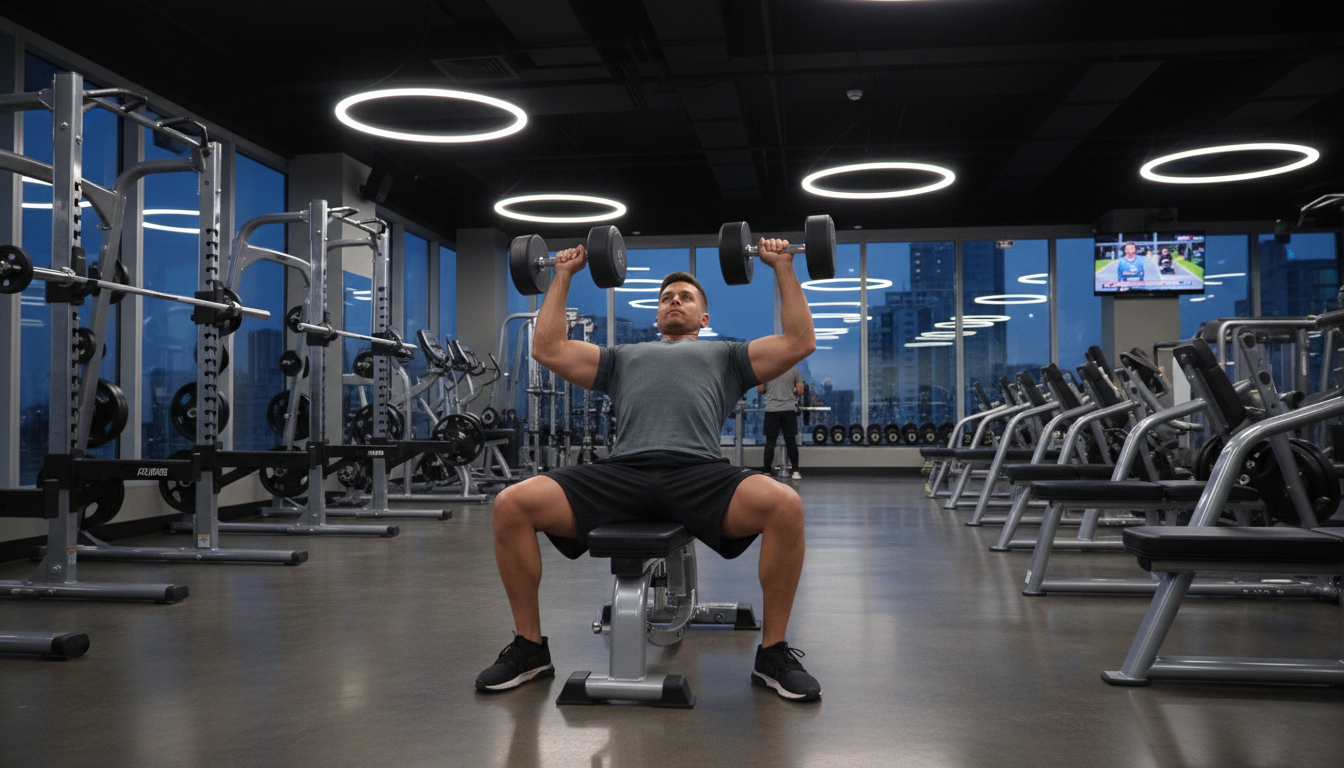
Today, I’m going to cut through the noise. We are going to strip away the complications and focus on one of the most fundamental pillars of building a strong, aesthetic physique: the push day workout routine. Whether you are looking to build a massive chest, boulder shoulders, or horseshoe triceps, this is where it starts.
By the end of this article, you won’t just have a plan; you’ll have the confidence to walk into the weight room and own your session. Let’s get to work.
Understanding the Training Split Basics: What is a Push Day?
Before we dive into the specific exercises, we need to address the framework. In the fitness world, we organize our weeks using “splits.” While full-body workouts are great, as you advance, you need more volume per muscle group to see growth.
This is where training split basics come into play. The most popular and effective structure for many lifters is the Push/Pull/Legs (PPL) split.
So, what exactly is a “Push Day”?
Think about human movement in simple terms. You can pull things toward you, or you can push things away from you. A push day focuses entirely on the upper body muscles responsible for pushing resistance away from your torso.
- The Movements: Pushing a barbell off your chest, pushing a dumbbell over your head, or pushing your body weight up from the floor.
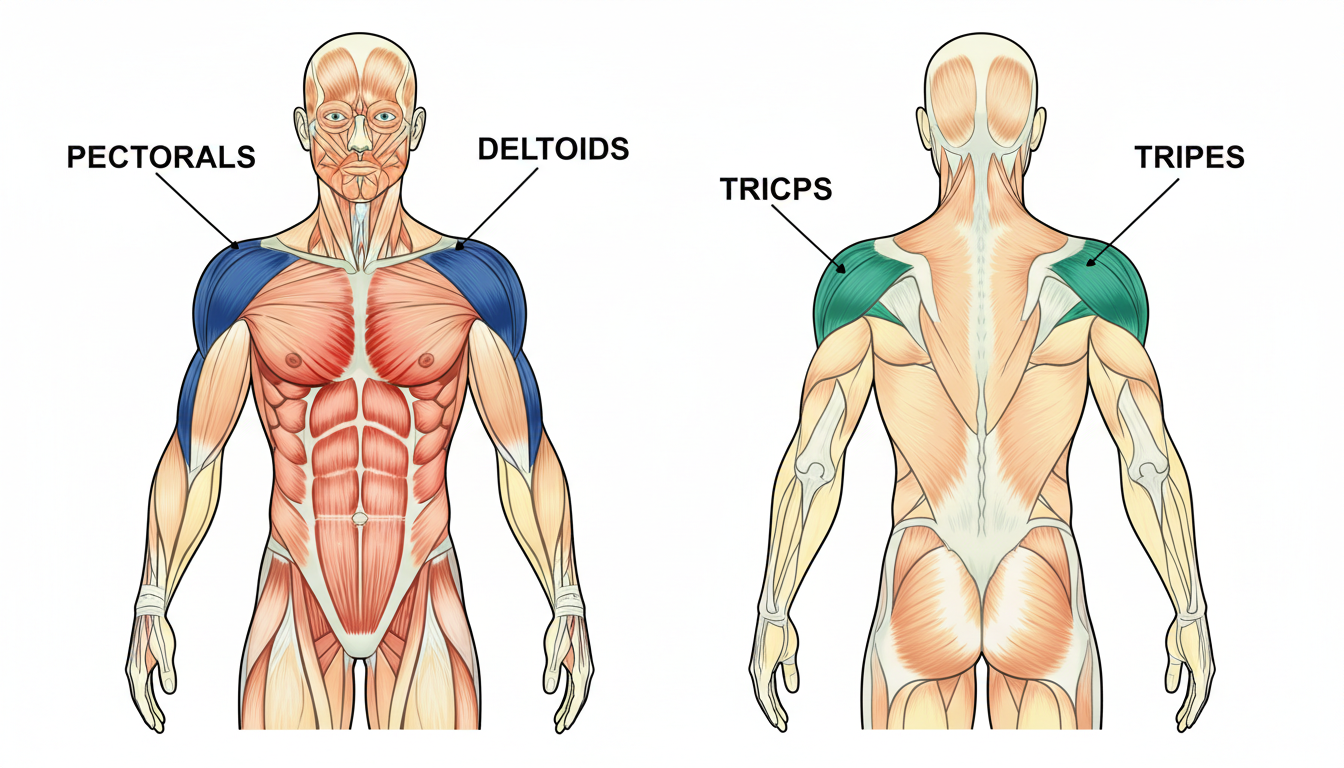
- The Muscles: The Chest (Pectorals), Shoulders (Deltoids), and the back of the arms (Triceps).
By grouping these muscles together, you maximize efficiency. When you bench press, you aren’t just using your chest; your front delts and triceps are helping drive the weight. By training them all in one session, you fully fatigue these synergistic muscle groups, allowing them to recover completely while you focus on “Pull” or “Leg” days later in the week.
Why the Push Day Workout Routine is Perfect for Beginners
I often get asked, “Adam, why shouldn’t I just do chest on Monday and shoulders on Tuesday?”
Here is the deal: if you train chest on Monday, your shoulders and triceps take a beating as secondary movers. If you try to train shoulders the very next day, those muscles are already fatigued. You won’t be able to lift as heavy, your form will suffer, and your risk of injury skyrockets.
A well-structured push day workout routine solves this. It consolidates the stress into a single session.
- Optimized Recovery: You smash your pushing muscles on one day, then give them 48 to 72 hours of total rest while you train other body parts. Muscles grow when you rest, not when you train.
- Simplicity: You don’t need to memorize complex schedules. If it involves pushing, you do it today.
- Balanced Development: Because you are hitting the shoulders and triceps alongside the chest, you prevent muscle imbalances that often occur when people skip “smaller” muscle groups.
Anatomy of the Push Day: Targeting Chest, Shoulders, and Triceps
To get the most out of your training, you need to have a basic mind-muscle connection. You need to visualize what is firing under the skin. Here is the anatomy of your push day.
1. The Pectorals (The Engine)
Your chest is the primary driver for horizontal pushing movements. It is divided roughly into the clavicular head (upper chest) and the sternal head (middle/lower chest). A good routine hits both angles. When you see a thick, armored-looking chest, that is the result of heavy compound pushing.
2. The Deltoids (The Stabilizers and Movers)
Your shoulders have three heads: anterior (front), medial (side), and posterior (rear).
- Front Delts: heavily involved in all pressing movements.
- Side Delts: responsible for width and the “V-taper” look.
- Rear Delts: usually trained on pull day, but important for stability.
On push day, we focus heavily on the front and side delts to create that 3D shoulder look.
3. The Triceps (The Finishers)
The triceps make up two-thirds of your upper arm mass. If you want big arms, stop obsessing over curls and start pressing. The triceps extend the elbow. At the top of every bench press or overhead press, it’s your triceps locking out the weight.
Designing Effective Push Routines: Core Exercises for Results
Now for the meat and potatoes. There are hundreds of exercises out there, but I’m a believer in mastering the basics before getting fancy. Effective push routines are built on compound movements exercises that use multiple joints and muscle groups simultaneously.
Here are the non-negotiables:
The Flat Barbell or Dumbbell Press
This is the king of upper body exercises. It builds raw strength and overall mass. Using dumbbells can be better for beginners as it identifies strength imbalances between your left and right sides and allows for a slightly greater range of motion.
The Overhead Press (Military Press)
This is a vertical push. It targets the shoulders and triceps while requiring significant core stability. If you want to look strong standing still, you need to press overhead.
The Incline Press
By setting the bench to a 30 or 45-degree angle, you shift the focus to the upper chest (clavicular head). This is crucial for filling out the area just below your collarbones, giving the chest a fuller appearance.
Lateral Raises
This is an isolation movement for the side delts. It’s the secret weapon for looking wider.
Tricep Isolations
We finish with movements like rope pushdowns or skull crushers to isolate the back of the arm after the heavy pressing is done.
The Ultimate Beginner Gym Workout Plan: Step-by-Step Guide
I’ve designed this gym workout plan specifically for someone within their first year of training. It balances volume (how much work you do) with intensity (how hard you work).
Adam’s Coach Notes:
- Rest: 90–120 seconds for compound lifts (the first two exercises). 60 seconds for isolation lifts.
- Warm-up: Spend 5-10 minutes doing light cardio and dynamic stretching (arm circles, band pull-aparts) before touching a weight.
The Routine
1. Flat Dumbbell Chest Press
- Sets: 3
- Reps: 8–10
- Why: We start here because you have the most energy. Focus on a controlled negative (lowering the weight).
2. Standing Overhead Barbell (or Dumbbell) Press
- Sets: 3
- Reps: 8–10
- Why: Hitting the shoulders while the triceps are still relatively fresh. Keep your core tight and glutes squeezed to protect your lower back.
3. Incline Dumbbell Press
- Sets: 3
- Reps: 10–12
- Why: Higher reps here to pump blood into the upper chest. The angle shouldn’t be too steep 30 degrees is the sweet spot.
4. Dumbbell Lateral Raises
- Sets: 3
- Reps: 12–15
- Why: We want metabolic stress here. Don’t swing the weight. If you have to swing, the weight is too heavy. Lead with your elbows.
5. Tricep Rope Pushdowns
- Sets: 3
- Reps: 12–15
- Why: Isolating the triceps. Keep your elbows glued to your sides; only your forearms should move. At the bottom, pull the rope apart for a peak contraction.

Mastering Your Form: Expert Tips for Safety and Growth
A gym workout plan is only as good as your execution. You can have the perfect list of exercises, but if your form is trash, you aren’t building muscle you’re building an injury profile.
Retract Your Scapula
On any chest press, imagine you are trying to squeeze a pencil between your shoulder blades. Keep them pinned against the bench. This protects your shoulders and forces the chest to do the heavy lifting. If your shoulders roll forward, you lose chest tension and risk rotator cuff injury.
Tuck Your Elbows
When pressing (bench or overhead), never flare your elbows out at 90 degrees. This puts immense strain on the shoulder joint. Instead, tuck them slightly at about a 45-degree angle or roughly 75 degrees. Think “arrow shape,” not “T shape.”
Control the Tempo
Beginners often rush. They let gravity drop the weight and then bounce it back up. I want you to own the weight. Take 2-3 seconds to lower the weight, pause for a split second, and then explode up. The “eccentric” (lowering) phase is where a massive amount of muscle tearing (and subsequent growth) happens.
Progressive Overload: How to Keep Getting Faster Results
If you want to change, you have to challenge your body. The human body is an adaptation machine. If you lift the same 30lb dumbbells for 10 reps every week for a year, your chest will look exactly the same in a year.
You must apply Progressive Overload. This doesn’t just mean adding weight. It means increasing the difficulty over time.
Here is how you track it:
- Increase Weight: If you hit 10 reps easily with good form, add 5lbs next week.
- Increase Reps: If you stuck at 8 reps with 40lbs, try to get 9 or 10 reps next session.
- Decrease Rest: If you usually rest 2 minutes, try resting 90 seconds.
- Better Form: Doing the same weight with slower, more controlled technique is a form of overload.
Adam’s Tip: Keep a logbook or use an app. If you don’t measure it, you can’t manage it. You need to know what you did last push day to beat it today.
Common Mistakes to Avoid in Your Push Workouts
I’ve spent years watching people spin their wheels. Here are the pitfalls that will kill your gains if you aren’t careful.
The Ego Lift
This is the most dangerous mistake. Trying to bench press 225lbs when you can only handle 135lbs with good form doesn’t impress anyone it just scares us. Leave your ego at the door. Quality reps build muscle; garbage reps build injuries.
Neglecting the Triceps
Remember, the triceps are the lockout muscle. If your bench press is stalled halfway up, it’s usually because your triceps are weak. Don’t skip the accessory work at the end of the session.
Overtraining the Front Delts
Your front shoulders get hammered on bench press, incline press, and overhead press. You do not need to do “front dumbbell raises” as an isolation exercise on push day. It’s redundant and can lead to inflammation. Focus your isolation work on the side delts instead.
Ignoring Training Split Basics
Consistency is key. You can’t do a push day, skip the gym for a week, do a leg day, and expect results. The training split basics rely on frequency. You should be hitting this workout roughly every 4 to 5 days, or twice a week if you are on a 6-day PPL split.
Conclusion: Take Your First Step Toward a Stronger You Today
Building a physique you are proud of is a marathon, not a sprint. But every marathon starts with a single step. By adopting this push day workout routine, you are laying the groundwork for a stronger, healthier, and more confident version of yourself.
Don’t overthink it. Go to the gym, focus on your form, push the weight, and aim to be just 1% better than you were last week.
The roadmap is right here. The weights are waiting. I’ll see you on the gym floor.
Yours in strength,
Adam Steele